Big Jim Thunder Child Review
56" AMO 46# @ 28" 2-piece Takedown
It has been a good long while since my last bow review. Life has been keeping me rather busy with work and family so I haven't been able to check out new bows, much less take the time to review them. I still have some bows that I haven't had the chance yet to review and those will be upcoming as I find time to record my experiences.
Up for review this entry is Big Jim's Thunder Child 2-piece takedown longbow. I have long known of Big Jim and his high-end bows but never got a chance to handle one, let alone see one in person. Big Jim is well known as a bowyer producing beautifully handcrafted bows that perform as well as they look. Of particular interest to me was his Thunder Child longbow, which is unusually short for being a "longbow". I started taking an interest to shorter bows ever since I took up bowhunting due to the compact maneuverability shorter bows provide. Having a 2-piece takedown system adds value in making an already compact bow even more portable.
Jim's custom bows currently have approximately a one year wait as of publishing this review. This speaks loudly of the demand for his outstanding work. Much like a busy restaurant where there is a crowd out the door, a bowyer who has a significant lead time usually has the high demand for a reason. I lucked out and found this particular Thunder Child for a great deal from the original owner who had purchased the bow directly from Jim himself at a traditional shoot. Getting a gently used bow for a fraction of the price of new and without the long wait? Sold!
**** 09/04/17 Update ****
I had Big Jim modify the grip to that of a medium. It is a slight change, but it make the bow so much nicer to hold. Check at the end of the post for more details.
- Riser -
The riser of this particular bow is made up of mostly clear glass with the limb and grip laminations running through it. The clear glass has a very cool greenish hue that is translucent in the light - it really reminds me of jade. This is the first nearly-solid glass riser I have seen and the aesthetics are wonderful. Not only does the translucent glass contrast well with the wood lams and the horn accents, but it also feels strong and solid. Like phenolic, I surmise the glass helps to add some heft to the riser to improve stability.

That's it for the riser. Can't expect too much for a little bow.
The grip section of this bow is wrapped in black beavertail leather. The leather provides both a secure grip and adds a nice aesthetic touch. The grip is of a low longbow type that has some forward angle to it so it is not as uncomfortable to me as a Hill-style longbow grip, but it does leave a little to be desired. I very much dislike straight broom handle grips as I find it puts my bow wrist at an uncomfortable angle and I cannot shoot too long like that. I don't mind a straight grip so long as it has some forward cant to it. Big Jim's website does list the Thunderchild as having an optional medium grip, which I would bet would be more comfortable to me. Still, I really can't complain about the grip too much given the practically new condition the bow is in and the price for which I got it.

I tried to capture the translucency of the glass as best as I could. I think it is most visible at the sight window where the glass is thinner.
The sight window is small and cut to center. I normally shoot with a slight cant and do not mind small sight windows. With such a small riser, you can't expect to get much window. Both the window and shelf are crowned to facilitate arrow clearance and minimize any contact. Not much to speak of in this area of the bow. Everything here works as it should. Jim knows what he is doing and all is good.

An archer's perspective of the tiny sight window.
- Takedown system -
The takedown system used by Big Jim is a carbon/glass sleeve socket type. The riser is cut down to a thinner than usual diameter where the grip is, and then cut at an angle to facilitate stress distribution when braced. The sleeve section is formed by wraps of fiberglass and carbon fiber that build up the grip to the original shape, or to whatever shape and height Jim wants to suit the customer. The entire process is documented by Big Jim himself on YouTube in a 10-part series. I watched the entire series and it is a very informative how-to on transforming a one-piece bow into a 2-piece. I certainly do not have the bowyering skills to attempt such a conversion, but I feel I at least know the general idea of how it is done. I did email with Jim about converting a one-piece into a 2-piece and his response was that not all bows can go through the conversion process. In the bows he plans for the 2-piece conversion, he specifically designs them to withstand the stresses of a 2-piece sleeve socket. They need to have sufficient material quantity and quality before they can be modified as such. Good to know. Another reason why I'd leave that to a master bowyer.

Most sleeve socket systems are very simple. This example has a groove on each side, which I assume would improve the tight lock-up and minimize any movement of the two halves.

A view of the bow taken down and halves laid side by side.
One thing I really like about the sleeve socket system is how the takedown system is completely hidden. The sleeve would look different than the rest of the material the bow is made of, but Jim neatly hides the sleeve under a beavertail leather wrapped grip. Not only does it look great, but the stippled surface of the beavertail leather improves grip and handles sweaty hands very well. If you handled this bow in a braced up state, you would never know it is a takedown. It is completely solid and exhibits no rocking or creaking in the sleeve joint. It also requires no tools of any sort. Just unbrace the bow and pull the two halves apart to separate. This bow required a dedicated effort to separate the two halves. When I first received the bow, it was already separated for ease of shipping, but I could feel the precise, tight fit of the two halves when putting the bow together for my first time. Even unbraced, the bow feels solid and has absolutely no movement between the two halves. If you are proficient in the push-pull method of stringing a bow, you can have this bow put together and braced up in a matter of seconds with just your bare hands.

A view of the glass used in riser construction and one of the grooves of the takedown system.
- Limbs -
The limbs of this bow are bamboo cored with verawood laminations on the back and belly for aesthetics. Unique to this particular bow is a lamination of carbon fiber on the back side, just between the verawood veneer and bamboo core. Upon talking to the original owner of the bow, it seems the carbon lamination was added not specifically for speed, but for improved limb stability. Carbon can add speed to a limb by reducing limb mass since it is stiffer than fiberglass, so less material needs to be used to achieve the same level of draw weight. It also can greatly improve limb stability if used properly and if the carbon fibers are oriented in the correct directions.

A profile view of the limb tip shows you how the horn and wood stack up
Being a reflex/deflex type of longbow, I expect to see some limb reflex, but the Thunder Child has an extreme amount of reflex - almost to the point of being a recurve! This has to do with the bow design being a short longbow with a forward handle. The extreme reflex limb design and forward handle allows for the bow to be as short as possible and capable of handling a long draw. I have a relatively conservative 27" draw so I know this bow can easily handle me shooting it, but I have heard of folks with 30-31" draws comfortably shooting a 56" Thunder Child. A bow that short that is designed to handle that kind of draw is truly impressive.

Closer detail of the limb tip.
The limb tips are adorned with moose antler, matching the same antler cap on the back side of the riser. Being a modern bow, the tips are built to take fast flight strings and the bow comes with one that I assume to be of a modern material. The string had a fair number of twists in it and was well waxed, but in excellent condition. Two wool silencers were tied into the string and the black and brown of the puffs matched the bow woods nicely. Being that I generally dislike having lots of twists in my strings, I swapped out the original string for a 56" string from Centaur Archery and added my usual Dyneema puffs. This string resulted in fewer twists and in my opinion, the string colors matched the bow woods better.
- Tuning -
Being a used bow, the Thunder Child came to me already set up to shoot with a hair rest, string with silencers, and double nock points. The previous owner had taken meticulous care of the bow and it arrived in pristine condition without even a scratch anywhere. A quick check of the nock height indicated it was pretty close for me. The bareshafts ended up a tad nock high and the center serving was a bit on the loose side for my nocks, so I ended up swapping to a new Centaur Archery string and went about determining proper nock position.

Fully braced profile of the Thunder Child. Note how the handle is positioned forwards and the limbs have a significant amount of reflex to them
To ascertain nock position, I will usually first tune for brace height by shooting and listening to how the bow sounds. I didn't have the luxury of having a spec sheet or listing at my fingertips as to what the recommended range should be, but after pulling a few shots and adding/subtracting some twists, I settled upon 7-3/4" as a brace height that was as low as I could go, but still shot quietly. I later discovered the recommended brace height range as being 7-3/4" - 8-1/4". Seems my tuning-by-ear technique worked nicely! With the brace height set, I bareshaft tuned till everything was grouping together well and finished by tying in the nock locators. The 540gr. Easton Legacy arrows flew pretty well from the bow, despite the draw weight being a few pounds lighter than what these arrows usually tune to. On my digital bow scale, the Thunder Child comes in at 43# @ 27". Bareshafts were just a bit stiff, and would show more stiff if I short drew the string before loosing. My lighter and weaker spined 460gr. Gold Tip Warrior 500 shafts exhibited better bareshaft results and came in at about 10.7GPP. I decided to stick with those for the remainder of the review.

Unbraced, you can still see heavy reflex/deflex shape of the bow. Kinda looks like a mustache... A bowstache!
As usual of my reviews, I like to send some shots over the chronograph to get an objective measure of performance. A 5-shot average of 148.5fps was what I obtained, shooting a 12.3GPP (grains per pound) load with the Easton Legacy arrows. Not the fastest bow, but that is pretty respectable for hauling a heavy arrow down range. I don't believe the Thunder Child was originally designed as a speed bow, but more of a compact bow that will fit in the tightest of quarters and still be able to deliver solid performance under all conditions. I would think that the higher brace height might have some slight detrimental effect on the speed. With a higher brace height, the effective power stroke of a given bow is reduced and that results in less acceleration being supplied to the arrow. However, the limbs have significantly more reflex to them, and that reflex serves to increase arrow speed, so perhaps the two balance each other out. Switching to the Gold Tip Warrior arrows, speeds jumped up to 157.1fps.
- Shooting -
As with most of my bows, I take the first few shots at home in my basement mancave range. 12 yards is usually a pretty good starting distance for me with any new bow. Far enough I can get 90% of tuning done, and super convenient for when the kids are sleeping and my wife is busy watching her evening TV shows.
With the bow tuned in as best as I could, I set about picking at the soup can sized spots on my Block target. Since the shelf was cut to center, the addition of the velcro pad pushed the arrow further out from the window and resulted in the point of impact being slightly to the left. It took but two ends of 6 arrows for me to get acclimated to the sight picture and brought the point of impact right into where I was looking. Canting the bow helped minimize the left POI (point-of-impact) bias. I was soon able to maintain some pretty tight groups and keep them mostly in the white spot with the usual flier or two. I think the straight and low grip will take some getting used to, but at least it is not straight vertically like a Hill-style longbow. If I could have had anything changed about the bow, I'd request at least a medium wrist grip.
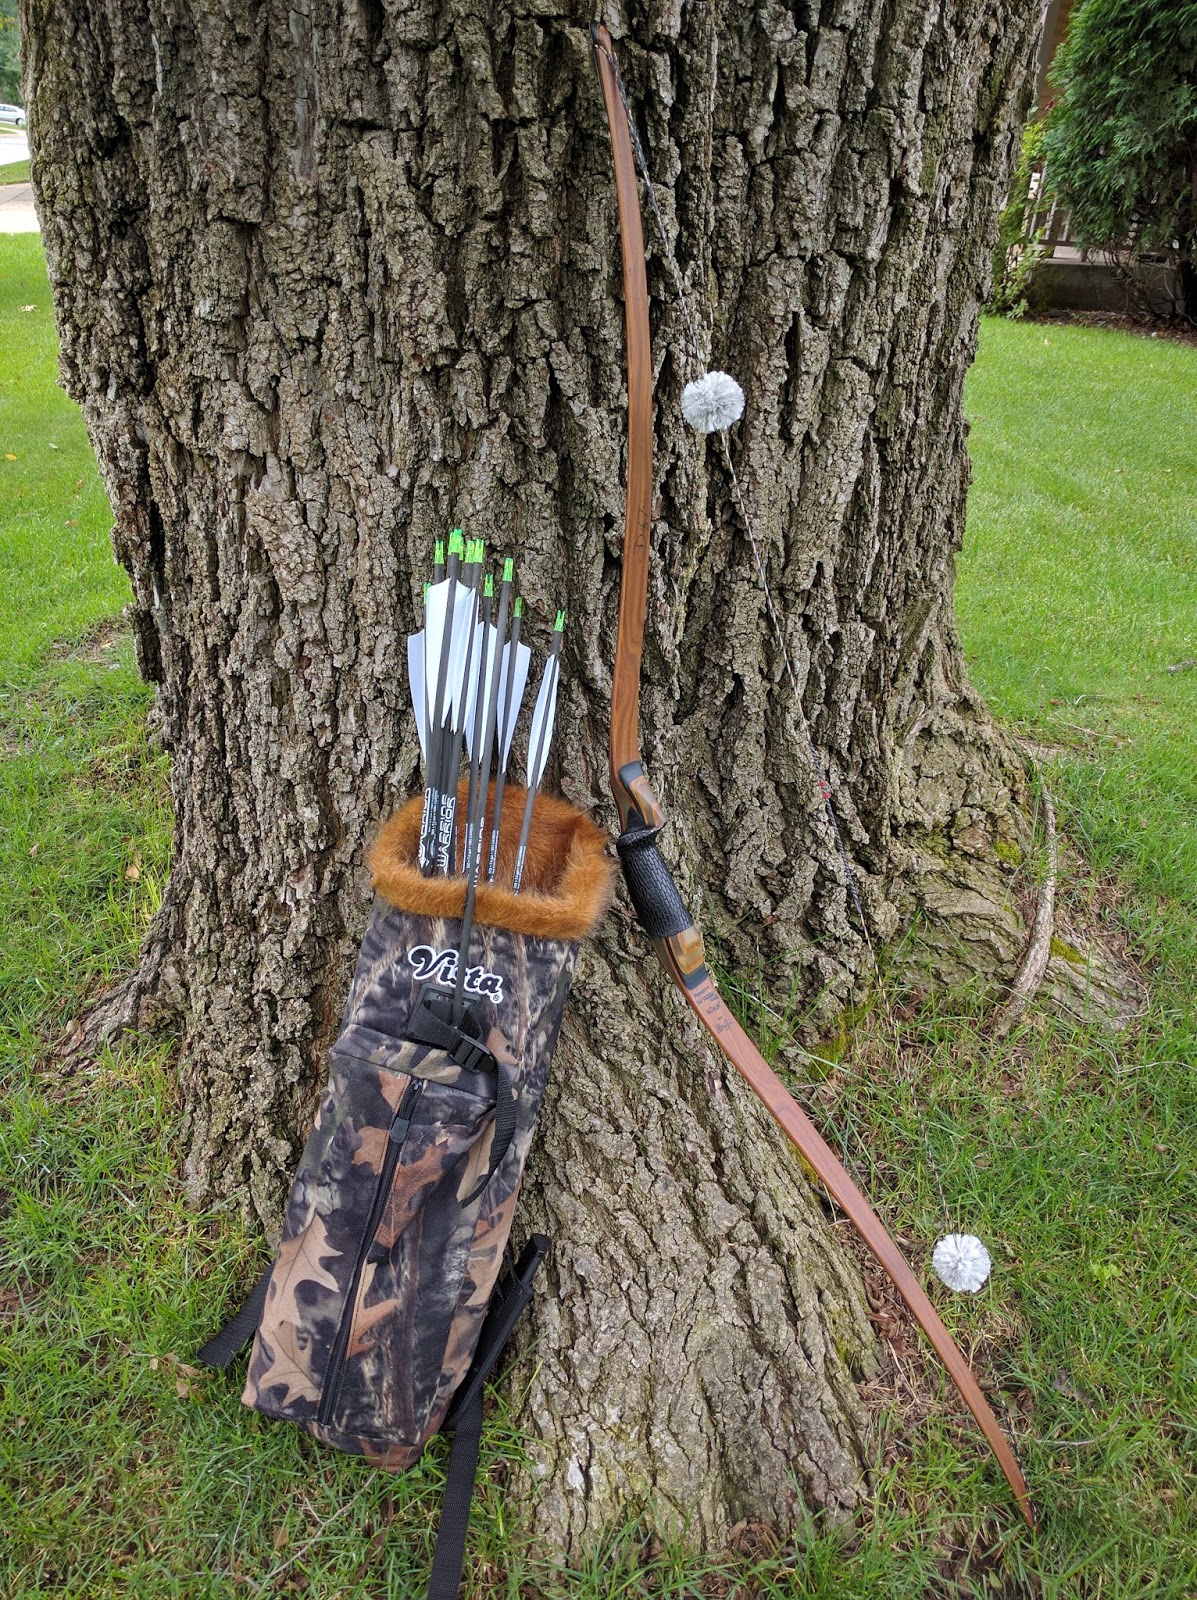
A bow and its quiver are like two best buddies hanging out
I headed out to the usual archery club and shot the outdoor walk-through range. I loved how quickly and easily the Thunder Child came apart and slipped into the bow pocket of my Vista Maverick quiver, and how easily it all came back together once I got to the range. Probably spent less than 30 seconds total taking it down, stowing it, taking it out, and bracing it back up again. Love it!
The first target was at 30 yards and I estimated my point-on would have been about there. I came to anchor and put the arrow point right on the center of the bale. I let loose and watched the arrow impact about 9 o'clock of center. Not bad. Since I was the only one there, I spent some time at the 30 yard bale to nail down my point-on distance and get acclimated to the bow. I continued on down the path and shot the rest of the course, with targets as close as 10 yards and as far as 80. I had difficulty hitting the 80 yard target with my aiming point of reference being somewhere up in a tree behind the bale. I didn't lose any arrows at 80 yards, but I sure as heck would not be taking any shots at anything that far out. For most hunting-distance targets of 30 yards and closer, the Thunder Child shot very well with the Gold Tip Warrior 500 arrows. I would feel quite confident taking this bow with me into a ground blind or tree stand.

Gotta love the takedown bow storage pocket of the Vista Maverick quiver. I love how neatly the Thunder Child tucks away in there for a quick grab-n-go package
I found the Thunder Child to be quite accurate if I did my part. The 80 yard bale was really pushing my own limitations, but I am quite sure a more competent archer would have little issue keeping arrows on target. I also noticed the bow to be pleasantly silent with only a subdued thunk on the loose and no handshock to speak of. I have the Thunder Child only wearing the two string puff silencers and nothing else in the way of damping. I'm sure a set of Limbsavers would bring the noise to whisper levels, but I think that would compromise the minimalist look of the bow. That and I wouldn't be able to slide on my Selway quiver for when the fall comes around.
- Final thoughts -
The Big Jim Thunder Child is one neat little bow. It is the shortest longbow I have ever shot and it really doesn't feel like it gives up much to longer bows. Honestly, I don't know if it could be called a "longbow" given its overall length. More like a shortbow. Whatever it would be classified as, I like it. The short compact design makes it great for use in ground blinds and brushy areas as well as mancave basements with low ceilings.
Despite its compactness, the Thunder Child does not seem to have the typical drawbacks of a short bow. There is no finger pinch to speak of, the bow feels nice and relatively steady at full draw, and it can easily handle my conservative 27" draw without overstressing the limbs. I see the Thunderchild as a good multi-role bow that will fit a number of needs. It is accurate, quiet, reasonably fast, and very compact. It is a bow that would be equally at home on a 3D course, at an indoor league, up in a treestand, or neatly stowed in your pack as you hike out to hunt camp. That it looks wonderful and has beautiful lines makes it all the better. Oh, and it takes apart for super easy transportation!
Here is Big Jim's wonderfully informative 10-part series of how to build a takedown bow:
Part 1
Part 2
Part 3
Part 4
Part 5
Part 6
Part 7
Part 8
Part 9
Part 10
**** 09/04/17 Update ****
After shooting the Thunder Child for some months, I wondered if it would be better if I had the grip modified more to my liking. After all, a bow should be made to suit the archer and not the other way around. Between the time of this review and the update, I acquired another Big Jim bow - a Mountain Monarch 60" 2-piece recurve (see the review here). While I liked everything about it, the thick and low grip bothered me. What I really desired is a grip that resembled the custom one on my Centaur Triple Carbon Elite (see it here) - one with a slim throat and a medium-high wrist.
I decided to not let the grips get the better of me, so I shot off a series of e-mails to Big Jim and inquired about the process of having him modify the grip to my liking. I was very pleased with how quickly he replied my e-mails and answered my questions. After a bit of back and forth and some photos to show how I liked the grip, I packed up both bows and sent them off to Big Jim's workshop in Albany, GA. Ironically, I was in Atlanta, GA recently with my wife for a brief vacation and had wanted to stop by to see Big Jim's shop, but it was a 3 hour drive from our hotel and we didn't have time in our itinerary to make the trip.
With the modified grip, I found the Thunder Child to be significantly more comfortable to hold and it felt like the bow pointed more naturally. My groups didn't seem to change, but I think that has more to do with my busy work/family life and not having enough time to devote to practicing. At any rate, I really liked how Big Jim was able to build up the palm swell area and then blend it back down so that it didn't look horrible. Of course, I had to have the beaver tail wrap that both looks and feels nice. I requested he make both bows have the same grip shape and size and he did just that. I won't get into the Mountain Monarch's grip here, since it has its own review posting. Below are some photos of the grip as it is now:


Here is a side-by-side comparison between the grip as it originally was when I received the bow and how it is now after the modification:

As you can see, the modification did not add a whole lot of material to the grip. Aesthetically, I prefer the lower straighter grip, but my hand much prefers the modified version. I am really glad I had sent the bow back to Big Jim for the modifications. I felt he really listened and paid extra attention to trying to achieve exactly what his clients want. Big Jim has a himself a steady fan right here!


Comments